EDIT 2/26/2024: After moving into a house where I can have a permanent workbench set up again, I have enabled comments on this page and am offering repairs on these units upon request. Feel free to reach out to me.
EDIT 3/6/2021: I’ve got a new post up with a video of this repair. I’m embedding it near the bottom of this post as well for convenience
The world is a small place sometimes. Last year, I was cruising Craigslist and came across a Technics tape deck and some classic gaming accessories. Met the guy, made the exchange. Mentioned what I do — a few weeks later he texted me asking if I would like to take a look at seven or eight Takamine preamps that had low or no output. Turns out he’s the admin of a multi-thousand member Facebook group for the guitars! Some worked in ‘Pass’ mode or picked up on a digital tuner, but weren’t getting a signal to the amp.
I said that I’d take a look at them (I figured they just needed recapped), and he neglected to tell me that the units had been deemed “unrepairable” by most techs for some reason. So I designed a repair. Charlie supplied me with these schematics:


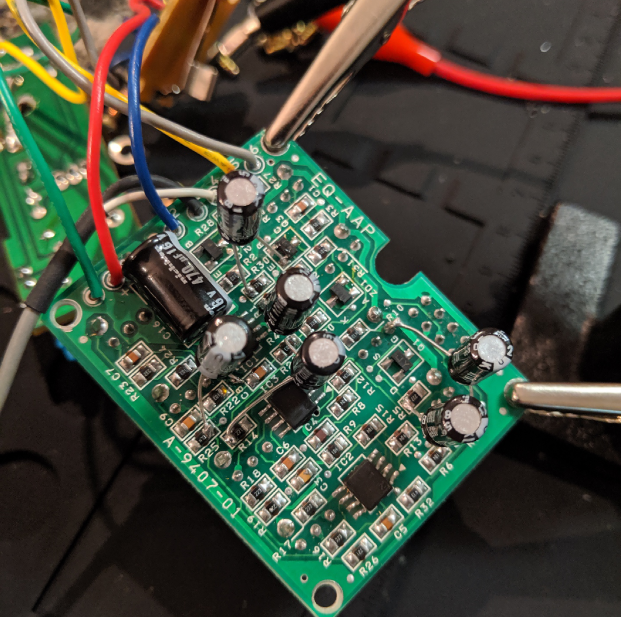
And I got to work. First, we’d need to depopulate the six surface mount caps present in between the sliders, the cap on the volume board, and the radial power cap on the mainboard.
The integrity of the pads isn’t of much concern. The plastic sliders make putting in new surface mount caps unfeasible, and the back of the board has adequate room in the plastic casing to insert radial caps in circuit. I started by yanking these and their pins off with needlenose pliers.
One quirk is that the volume board could have a tantalum capacitor or an aluminum electrolytic. I replace the tantalum when I recap them (because why not), though it’s worth noting that you’ll experience a degraded signal if you replace a tantalum with an aluminum — I suspect that a different component is used elsewhere though the board revision is the same. I have a photo of each type:

| Reference Designator | Capacitance/Voltage | Positive Lead | Negative Lead | Notes |
| C301 | Aluminum: 4.7 uF/25V Tantalum: 4.7 uF/16V | Marked on board | Marked on board | On some units, negative lead is bridged to R301; this is fine |
| C16 | 470 uF/16V | By wire pad 1 | By wire pad 2 | Polarity marked on board |
| C10 | 0.47 uF/50V | South pin of R1 | North pin of R1 | |
| C11 | 0.47 uF/50V | South pin of R5 | North pin of R6 | |
| C12 | 0.47 uF/50V | Point north of R22 | North pin of R25 | Orange Circle |
| C13 | 0.47 uF/50V | South pin of R30 | Emitter of Q3 | Q3’s Emitter marked with ‘E’ |
| C14 | 4.7 uF/25V | Pin west of Q1’s Gate Ref | North pin of R7 | Green Circle |
| C15 | 10 uF/16V | South pin of R14 | North pin of R21 |
With this parts list and connection points, one can restore an AAP to full functionality! If using quality caps, it’ll perform just like new. The cardinal directions from the table are based on the board’s orientation that I use, and I’ve marked some of the confusing spots:

Yet another issue can arise though — depending on whether or not a certain pad is lifted or corroded when ripping out the surface mount caps, you may require a lead wire to restore functionality to the battery LEDs. It doesn’t hurt anything to include it even if it’s not needed, so I put it in every one just in case. Put it between the south pin of R30 and the collector of Q2 (marked with a C, conveniently).
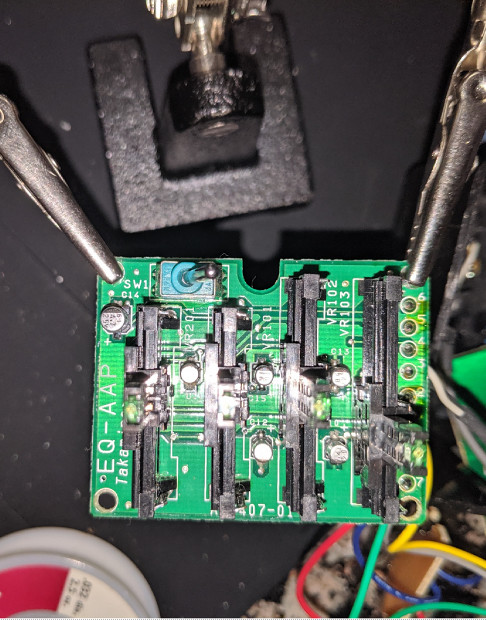
When you’re done it should look something like this:

I’ve embedded a video below, thanks to Peter for sending me one to repair and film!
That leads us to the question of how well this repair works, and if it’s worth the time. I did a spectrum analysis using RightMark Audio Analyzer on a completely dead unit, and performed it again after the repair with a test signal. Since the units only have one input, the white line is of interest on the following graphs, and unfortunately I couldn’t turn the other channel (green) off.


If you’d like to repair one of these yourself (or live overseas), I’ve created a repair document for these. One link is to Google Docs which displays better on a mobile device, and there’s also a .docx version that prints well. You’re free to use my repair and reproduce the document, as long as you don’t remove the attribution to me! Help keep these units out of the trash bin!
Google Docs: https://docs.google.com/document/d/13MOxv4_ibWleL4FQmpPmd2tt4dgot6HWJ-0pBwnpou4/edit?usp=sharing
Microsoft Word (docx): https://drive.google.com/file/d/1zgc5hUz_NwyO6gO1QureVq51Zp5IEC7O/view?usp=sharing
52 replies on “Takamine AccurAcoustic Preamp Recap Repair”
This is brilliant. Thank you. I’d definitely like to get you to fix my Accuracoustic when travel to the US is back on.
Your initiative is very good, I hope to fix mine, thank you very much.
Hi there …
I suck at soldering and would rather have someone else change capacitors for me on this one.
Mine is dead on EQ mode, works in PASS, 95% capacitors just leaked or alike.
How much would you take for such a fix – minus shipment which is on me ? I am in Stoughton, MA
Hi, I’ll send you an email shortly
So glad you’ve got this post up. Really hope you get a lot of keyword-search traffic through here. Can’t thank you enough for your contribution to the Takamine guitar community!
Thank you very helpful.Can you please explain about the jumpers for the LEDs.
Sometimes when removing the old caps (since the easiest method to avoid damage to the sliders is to just wiggle them off with a pair of needlenose pliers), you might lift a pad connecting the LED circuit to the rest of the unit. The jumper wire will add this connection back in so that the LEDs light when the battery check button is pressed in. If the pad is lifted and the jumper wire is absent, the LEDs won’t be able to light.
You can check continuity between the listed jumper wire points with a multimeter and you don’t need to add it if there is continuity between those two points — though I did omit that to keep the document straightforward and concise.
Let me know if this helps!
Hi Bradley,
Thank you for sharing your hard work. I’m not setup to do micro-type soldering or repair. Problem with hands, too. Would you consider repairing my Takamine GRAPH-EX PreAmp at a quoted cost?
Thank you for your consideration.
Hi, I have not worked on a Graph-Ex previously, but I’d be willing to take a look at it for you. However, I just moved from Indiana to Texas — if you could give me 3 – 4 weeks to get settled in, I’ll hopefully have some time to look at it then.
Thank you very much again,everything is working perfrect.
[…] a follow-up to my previous post regarding the Takamine AAP repair, I’ve created a YouTube video. When I first began repairing […]
Have a AccurAcoustic EQ I would like for you to repair. Thanx
Hi, I do offer repairs of the units. However, I just moved from Indiana to Texas — if you could give me 3 – 4 weeks to get settled in, I’ll hopefully have some time to take it on then.
I have a Takaminie AccurAcoustic which produces output, but the EQ Sliders have NO impact on the sound. Can you repair it? Please send me an email with cost estimate.
Hi Paul, sending you an email!
I have a Takamine AccurAcoustic which make a lot of static-noise intermittently. Is it fixable and approx cost please.
If the AAP has acceptable output, the capacitors likely haven’t fully decayed. Static could be introduced by a dirty preamp output jack (the top of the output jack is actually clear if you remove the back cover of the preamp), the cable from the preamp output to the guitar jack, or the cable to the amplifier.
As far as the recap process I charge $50 plus shipping to perform the repair. I think for the static issue you might have to rule out the other variables I mentioned.
I performed the repair and the pass mode sounds great!
When i engage EQ i get reduced out put and the Bass EQ actually CUTS the volume…..
Charles, I think you’re going to have to double check your soldered connections to make sure everything is correct. C12 or C15 are the first two I would check, since the output is reduced when pass is switched on. C12 is a bit difficult to get connected to the marked point without bridging anything else.
Let me know if you get it!
[…] If you found this page but are trying to repair the much more common AccurAcoustic model, check here instead […]
I have 2 or 3 AAPs that don’t work. If you are settled in TX I would love to get these to you for repair. Also do you repair any other Takamine preamps?
Hi Randall. Yes, I’ve started taking on repairs again now that I’m all moved in in Texas. As far as other models, I’ve recapped an N4B (which was successful, according to the customer), but I’ve not been inside the others. I’d be happy to take a look at any model, but it would probably take some extra time to diagnose a new model.
If you’re interested in repairs, send me an email to bradleybowman@sabertech.dev and we can get that arranged!
You have email! Hoping you can help me with a dead AccurAcoustic as well.
Hey Chris, I’ve responded to the email you sent. Thanks!
Hello Bradley, I have a Takamine cool tube pre amp that needs to be fixed. I would like to talk to you and show you some pictures/videos of the issue. Can you contact me? I am in FL but willing to ship it to you to get it fixed depending on the cost.
Hi Allan, I’ve sent you an email
I made an attempt to contact you Mr. Bowman. I’m not sure you received it. I have an AccurAcoustic preamp in need of repair.
Yep, it came through Jim. I know some email programs don’t play nice with custom domain names these days! I’ll get back to you via email
Hey Bradley, I also have the accuracoustic in need of repair. Would love for you to take a peek
Hi Arthur, I’ll send you an email
Hi Bradley: I have an Accuraccoustic that only works in Pass mode. Would be great to connect directly with you on this. thanks.
Hey Geoff, I’ve sent you an email
inquiring about two acura acoustic repairs
both are not sending sound but light up leds
just wondering price to redo them
thank you
Hi Fernando, I’ve sent you an email
Hi there great page by the way! I am based in London UK? Wondered if you are still repairing these now? Was about to go in the bin only the pass works and Leds work. Sliders are a bit beat up lost the plastic too caps to a couple… Totally dead on EQ side. Thought i’d try ! No worries if you’ve stopped doing these. Kind regards Justin
Hi Justin, I’m based in the US and I don’t repair them internationally, sorry.
Accuracoustic Repair:
I own two Takamine guitars with accuracoustic p/u (NP18C & NP17C). Looking to have both repaired. Lights come on one, all static and the other will work every so often, yet also static. I can mail units to you for your assessment. Thanks, Randy.
Hi Randy, I’ve reached out to you via email.
Olá, sou do Brasil e acabei de conseguir consertar um Takamine com sucesso seguido estes passos!! Brilhante!! Parabéns!!
Awesome, that’s great to hear!
I just performed this repair to a customer’s Takamine preamp, and it worked great! The instructions are spot on and precise. I appreciate all this info you put together to help others. Thanks!
Awesome Ryan! Glad to hear you were successful!
Hello, I’m looking to fix my accuracoustic preamp. It just stopped working one day. Are taking in repairs?
Hi, I’ll follow up with you via email.
Hi Bradley, thanks for your instructions on fixing this preamp. My brother asked me to have a go at fixing his, as it was working, but outputting at a low volume. This sounded like classic capacitor issues, so I thougt I’d have a go.
Well, I tested it today and it works on passthrough, but as soon as I switch it over to EQ, I get nothing, zero. Obviously that suggests I’ve made an error somewhere, but the repair went well and I felt quite confident I’d done it. Any advice on how I should try and fault find my work?
Regards,
Chris
Hi Chris, always happy to hear that somebody is working on one! I think that based on the symptoms you describe, the issue is most likely to be with C12 or C14. Specifically the first thing I would check is the positive lead of C12 just because it’s tough to get just right on the first try. One thing I always do to ‘test’ C12 is to pull lightly on the body of the cap to put some pressure on the positive lead. If it’s connected well, the body of the cap will not move without you feeling the mechanical resistance of the leads bending a bit. If it’s not connected all the way, you’ll feel it ‘break’ away from the board very easily. What works best for me on this one is just having some melted solder on the tip of the iron and touching the lead and the point on the board simultaneously and then pulling away. It’s not very intuitive because generally this is not a very good way to solder but it does seem to work consistently in this case.
The positive lead of C14 has to weave between several pins the way that I do it so it’s also important to make sure this isn’t grounding out by contacting any of those pins. But I do feel based on the symptom that it’s likely to be an open connection vs a shorted connection. Let me know if you’re able to make any progress!
Hi Bradley,
many thanks for your reply. It turns out the problem was the larger C16 through hole capacitor (470uf 16v). I bought a bag of 5, and one of them was actually a 680uf 10v cap. of course, I picked that one randomly and fitted it to the board.
I’m sure seasoned pros double check their caps before fitting, unwilling to trust suppliers, but you live and learn!
I removed the offending cap, replaced it with the proper one, and now it works perfectly.
many thanks for providing the instructions. Your method resulted in a 100% successful repair. My brother is over the moon!
P.S – Oh yes, that C12 is the one I feared most going into this!
Regards.
Thanks for following up Chris, and I’m glad you were able to get it working! That’s an interesting outcome, given the symptoms. It’s good to have documented here what symptoms an incorrect cap in that spot will present for the future.
(I do generally trust suppliers to send me the correct parts in a bag. And most of these cap values tend to come on cut tape reels where it’s harder for an errant one to get bagged up. But then again now that I think about it I do tend double check as I’m placing the cap.)
Hi Bradley,
thanks for your reply. Just a quick followup – my brother bought his guitar to visit today and we were able to finally test the preamp in the Takamine guitar.
Everything seems to be working fine. There is only one thing we noticed that seemed unexpected. When we switch out the battery test switch, the green LED’s take about 30 seconds or so to fully go out, they slowly dim, rather than going out immediately.
It’s not a big deal, as we are just happy it works, but is that behaviour expected? Any thoughts on those LED’s?
Regards,
Chris
Hi Chris, generally, the LEDs can take up to a second or two to fully turn off after pressing the switch but I’ve not seen them take as long as you’ve mentioned. I have gotten them stuck on before — are you sure they’re not stuck on at a very low brightness even when the switch is off?
Did you have to add a lead wire for the LEDs? One thing I’ve had happen before, when using stranded wire, is having a stray strand end up touching something else. I started using a very small gauge wire to try to mitigate this (well, really, I try to be more careful when pulling the old caps off and this isn’t as much of an issue).
Another thing I’d check — is one leg of C13 touching the base pin of Q3? If you’re not careful with the angle of the lead, it’s really easy for some contact to happen there. I seem to recall one symptom of this being the LEDs stuck on.
Hey Bradley,
thanks for your reply. I didn’t do the wire mod for the LED’s because they worked, so I assumed it wasn’t needed.
The LEDs are definitely lit after the LED switch is in the off position. I can tell because if i pull the jack plug out the guitar, then you can see then shut off immediately, even during their 30 second “cool down”.
I can’t see anything touching where it shouldn’t.
Overall, it’s performing great. The sound is perfect, the EQ is functioning as it should, so I’m thinking i might just leave well alone!
Cheers,
Chris
Yeah, if it’s working acceptably otherwise, it might be best to just let that be. If you end up looking at it in the future, my advice would be to just double check each capacitor lead and make sure it’s not touching something it shouldn’t be. At least, any time I’ve run into a similar issue with the LEDs it’s been something like that.
Thanks for sharing your experience Chris!